
Experiencing this sound installation involves stepping into a custom-built soundproofed box (the mNAP) and listening to the twelve-minute piece I made on stereo headphones. Simple feedback on the piece can made by participants via a custom iPad interface I programmed using MaxMSP and the Mira app.

The audio file that mNAP participants hear inside the box can be heard below:
Recordings
The stereo piece I made for this installation used recordings I collected at various locations in and around Delhi from 30/11-4/12/2014. I used these recordings exclusively to make the piece: no other sound files, synthesised or otherwise recorded, were used.
The piece was mixed during an intensive three-day period in my hotel room in the Jangpura Extension area of Delhi. This was by no means quiet or ideal. In fact, the traffic noise outside the hotel often blended in with similar sounds in the recordings; this was quite confusing at times. But noise was reduced considerably for both myself, when mixing, and for participants, when listening, by using Beyerdynamic DT770 closed-back headphones (the piece was mixed for and on these mid-range cans).
The recordings were made with a Zoom H6 using OKM II in-ear microphones to create a binaural recording. The microphones that come with the H6 are perfectly decent but can’t compete with the OKMs for bass response; neither do they provide the 3D listening experience that the OKMs create when positioned in the ears during recording. Several participants commented on the strong sense of ‘being there’—sometimes to such an extent that they lifted the headphones off their ears to confirm whether or not they were hearing sound from outside the mNAP.

Of course I make no claim to be using the best equipment available here. All of this gear can be had for up to a few hundred—rather than thousands of—pounds at the most. An unessential and completely challengeable point perhaps, but I found it attractive to make the piece on and for the kind of equipment that other groups in India and elsewhere might be able to source and use for their own version of this project.
Reaper and mixing choices
Similarly, I wanted to use mixing software (a Digital Audio Workstation or DAW) which would be available to all. I chose to forego my usual DAW—Nuendo, which is, frankly, expensive—and instead use the very generously, even permissively licensed Cockos Reaper. As I was also giving a mixing workshop in Delhi as part of this project’s presentation at the Unbox Festival, I wanted participants to be able to be up and running with the same software I was using as easily and cheaply as possible.
Although the sound installation was both an experiment and a piece of social research, it was also, of course, an artistic undertaking. I was therefore quite liberal in my choice, ordering, and mixing of sounds. I wanted to create a form which explored and presented various aspects of the widely divergent urban and semi-rural environments I had recorded. I did not restrict myself to naked presentations of single recordings; instead I layered sounds—some of which were recorded in utterly different ambiences—in order to create a texture which was both sonically rich, varied, and formally dynamic, but also ran the gamut of sound pressure level extremes: from soothingly quiet to disturbingly loud.
For mixing geeks: This was my first project working with Reaper and I was very impressed with its stability, flexibility, and workflow. What pleased me most was the ability to apply clip-based processing. I haven’t worked with a system that offered this since my days of using Samplitude briefly in the late ’90s. What’s particularly useful about this approach is that you can apply one or more sound processing plugins to an individual clip, rather than having to process it offline or apply the plugins to a whole track (and thus end up using many more tracks, and potentially CPU resources than you should really need).
Mixing in spectral bands
The approach I took to mixing the various ambient recordings I made in Delhi was to think in terms of spectral bands. Just as colours can be seen in terms of their place in the electromagnetic spectrum—with frequency ascending as we move from red through green to blue and violet—we can view the audible frequencies of sound waves as grouped into different colours or bands.
Various approaches have been taken to dividing into useful categorical bands the frequency range audible to humans (approx. 20 to 20,000 Hertz (Hz)). Some are more scientific, such as the Bark Scale, with its 24 critical bands; others are more descriptive or pragmatic with regards to the different bands’ effect on the perception and mixing of sound. So with the latter approach we speak rather loosely of certain spectral areas giving a sense of, for example, power (the sub-bass region, up to about 60Hz), or brilliance (the highest frequencies, 6000Hz plus), or being wooly (too much bass: 100-200Hz), warm (mid-bass, 200-500Hz), or nasal (mids, 500-1000Hz). Of course these descriptions, and the frequency ranges given, are approximate and both subjective and dependent on context, but as guidelines they are useful to the mixing engineer.
I set up my Reaper session to have several tracks which were full frequency, i.e., to allow the unaltered recording to come through in the mix, but I also heavily used tracks set up with EQ—equalisation or filter—plugins to allow only a particular band to pass. Not only does this approach significantly affect the overall colour and feel of the mix, but it encourages me to always think about which part of the frequency spectrum I’m interested in when I select a particular sound to add to the mix. It can also lead to clearer mixes overall as sounds often end up being used for a particular frequency band only, and so are not in what we might call spectral competition with other sounds in the mix.
(I recommend anyone interested in the dark art of equalisation to take a close look at David Moulton’s articles on Spectral Management as they are both insightful, technically informed and informative, and practically applicable.)
For this piece I split the frequency spectrum into six bands only, as my feeling is that any more becomes too fussy and difficult to manage. More bands also end up competing with each other in a practical mixing session. I used DDMF’s Linear Phase EQ LP10 to do the filtering. In this plugin, both high and low pass filters are 12db per octave. I used only these two types of filters rather than bandpass filters as well, so I needed one of each to create the effect of a bandpass. Going the long way round like this allowed me to tweak the strength, or Q, of each filter separately. Settings are given below for each band:
- Sub-bass: 60Hz Low Pass, Q=0.5
- Bass: 60Hz High Pass, Q=0.72; 250Hz Low Pass, Q=0.8
- Low mids: 250Hz High Pass, Q=0.72; 2000Hz Low Pass, Q=0.7
- High mids: 2000Hz High Pass, Q=0.8; 4000Hz Low Pass, Q=0.86
- Presence: 4000Hz High Pass, Q=0.81; 6000Hz Low Pass, Q=0.92
- Brilliance: 6000Hz High Pass, Q=0.72; 16000Hz Low Pass, Q=0.86
For mixing geeks: I found the LP10 was more neutral than Reaper’s built-in ReaEQ, which seemed a little boomy to me, especially in the sub-bass region. Also, the linear phase quality of the LP10 was attractive in this application as I often mixed several instances of the same clip with different EQ characteristics and so didn’t want phasing issues—created by non-linear phase EQs—to smear up the mix.
Levels
Using an off-the-shelf sound pressure level meter from Radio Shack, I was regularly checking and annotating levels whilst recording. This was not only to garner data for comparison against safe working and residential noise levels but also to make sure that I could recreate the appropriate levels at various points in the piece when those and similar recordings appeared in the mix. There were, then, loudness targets which I set up when planning the piece, and these were related to the levels measured during recording. For instance, the loudest part of the piece, towards the end, reaches 96dB on the Beyerdynamic DT770 headphones when played through my RME Fireface sound card. This represents the average maximum loudness I experienced in and near beeping, loud traffic.

A simple, and by no means scientifically accurate but nonetheless pragmatically useful technique was used to ensure level translation: I checked mix levels by holding the business end of the level meter about as far away from the headphone speaker cone as the ear drum would be with the headphones in the normal listening position. Perhaps counterintuitively, given what I’ve just written, by placing such dynamically ‘true’ passages in artificial contexts within the flow of the piece and its mix, my premise was that it would be possible to attain a participant response quite different from the real context of the original sounds. Thus, while we might get used to a dangerously loud environment by ‘turning down the inner volume knob’ (essentially the same as becoming desensitised to sonic overstimulation), having a relatively swift change from quiet to loud might re-sensitise the listener to the original levels. My idea was that this might provoke a different response from that arising in the usual context of these loud sounds, which might be characterised in general as an acceptance of something continuously loud which is beyond the individual’s control. Or to put it more clearly perhaps, I wanted people to be shocked at just how loud their environment is, or at least to find out if they were or not.
Formal divisions using pdivide
Blank page syndrome—or in this case the blank mix window—is well known to many artists. A form of writer’s block, the blank page is, if you’ll forgive me for over-dramatising, a form of paralysing tyranny visited upon the artist by the expanse of nothingness which is the the not-quite-yet-underway project. Ideas may abound but the sheer amount of work and material needed before a final and finely-honed form appears is often terrifying to contemplate. One tactic to avoid the fear is to divide things up into bite-sized chunks, but losing yourself in details and not knowing where the work as a whole is headed can lead to incoherence and a general lumpiness of form. My solution is generally to plan the work from the top-down: all the major goals and tendencies are established in advance, even if they are modified as the unfolding details begin to dictate their own slightly different paths.
I knew in this second mNAP piece, for instance, that I wanted it to be less linear in its overall progression from quiet to loud than the first mNAP piece created in Ahmedabad back in March 2014:
I also knew that shorter term goals would make the piece more dynamically variable and engaging, even unpredictable, and that this might help the research aspect of the piece. So I had to divide the projected twelve minute duration into smaller chunks. I tend to work with quite simple proportions when doing this, either starting with a ratio and working recursively outwards to an unspecified duration (as in hyperboles are the worst thing ever) or, as in this case, working iteratively inwards from a known overall duration.
For the latter approach I use a simple function from my algorithmic composition software package slippery chicken: pdivide creates a list of proportionally related timings, dividing a duration into a number of smaller durations a specified number of times. We start with a proportion as a ratio—such as 3/2, as used in this piece—and divide the given duration into two parts according to that ratio. Then those two parts will each be divided into two parts according to the same ratios. This will iterate as much as the user needs.
Markers
Like most mixing software, Reaper allows the insertion of markers into the track session window. These can be set at specific times and will be visible in Reaper as variously coloured vertical lines dispersed across the timeline of all tracks. Markers are very useful for annotating a project and setting the location of important points in the piece that you’ll need to revisit again and again. In setting up my tracks in Reaper I determined to automatically add marker points according to pdivide timings.
Here I was aided by another feature of Reaper which I greatly appreciate: its file format is plain text, i.e., it’s readable and therefore editable by humans, as opposed to the machine-only readable/intelligible binary formats generated by most software. Within seconds I was able to find the part of the Reaper file which contained markers. A little bit of programming then allowed me to automate the process of setting markers at the points generated by my pdivide algorithm. The code given below is written in my favourite language, Common Lisp; the marker information it generates is also given. I copied this output directly into the Reaper file, reloaded the project, and was happy to see all the beautifully proportional target points appear in my mix window.
(As the pdivide algorithm specifies the number of times to iterate the proportional division process, I organised the marker code output to represent the level of division from one to five. I was thus able to view the overall form in terms of progressively major to minor formal divisions, or vice-versa.)
Common Lisp code to generate the formal division markers
(loop for level in
     (reverse
      (nth-value
       2 (pdivide 3/2 5 :duration (* 12 60) :alternate nil)))
   for level-num from 1
   with done = '()
   do
     (loop for time in (butlast (rest level))
        for i from 1 do
          (setq time (decimal-places time 3))
          (unless (member time done)
            (format t "~&  MARKER ~a ~a \"level ~a\" 0 0 1"
		    i time level-num)
            (push time done))))
Output
 MARKER 1 432.0 "level 1" 0 0 1
 MARKER 1 259.2 "level 2" 0 0 1
 MARKER 3 604.8 "level 2" 0 0 1
 MARKER 1 155.52 "level 3" 0 0 1
 MARKER 3 362.88 "level 3" 0 0 1
 MARKER 5 535.68 "level 3" 0 0 1
 MARKER 7 673.92 "level 3" 0 0 1
 MARKER 1 93.312 "level 4" 0 0 1
 MARKER 3 217.728 "level 4" 0 0 1
 MARKER 5 321.408 "level 4" 0 0 1
 MARKER 7 404.352 "level 4" 0 0 1
 MARKER 9 494.208 "level 4" 0 0 1
 MARKER 11 577.152 "level 4" 0 0 1
 MARKER 13 646.272 "level 4" 0 0 1
 MARKER 15 701.568 "level 4" 0 0 1
 MARKER 1 55.987 "level 5" 0 0 1
 MARKER 3 130.637 "level 5" 0 0 1
 MARKER 5 192.845 "level 5" 0 0 1
 MARKER 7 242.611 "level 5" 0 0 1
 MARKER 9 296.525 "level 5" 0 0 1
 MARKER 11 346.291 "level 5" 0 0 1
 MARKER 13 387.763 "level 5" 0 0 1
 MARKER 15 420.941 "level 5" 0 0 1
 MARKER 17 469.325 "level 5" 0 0 1
 MARKER 19 519.091 "level 5" 0 0 1
 MARKER 21 560.563 "level 5" 0 0 1
 MARKER 23 593.741 "level 5" 0 0 1
 MARKER 25 629.683 "level 5" 0 0 1
 MARKER 27 662.861 "level 5" 0 0 1
 MARKER 29 690.509 "level 5" 0 0 1
 MARKER 31 712.627 "level 5" 0 0 1
Timeline annotations
I’ve analysed the mix post-hoc to identify the sources of the most prominent sound files used. The google map of the locations is at https://goo.gl/maps/yl3Ys. The sound’s green loudness curve was created with my rmsps software
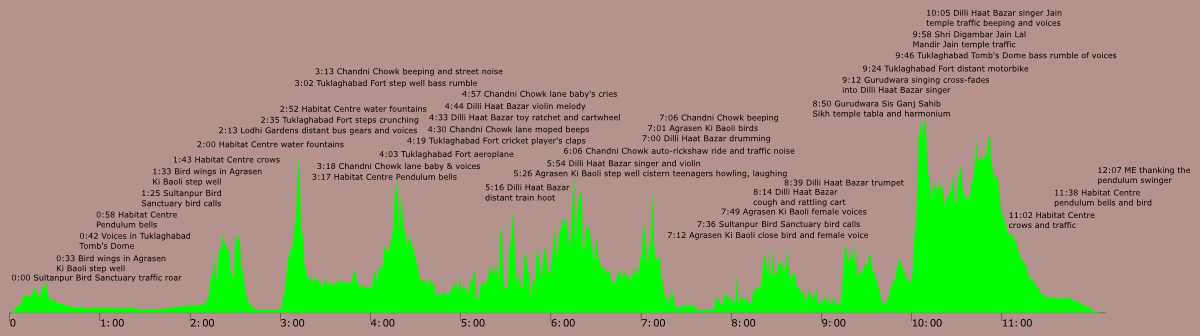
Here, in list form, are the annotations from the image above:
0:00 Sultanpur Bird Sanctuary traffic roar
0:33 Bird wings in Agrasen Ki Baoli step well
0:42 Voices in Tuklaghabad Tomb’s Dome
0:58 Habitat Centre Pendulum bells
1:25 Sultanpur Bird Sanctuary bird calls
1:33 Bird wings in Agrasen Ki Baoli step well
1:43 Habitat Centre crows
2:00 Habitat Centre water fountains
2:13 Lodhi Gardens distant bus gear change and voices
2:35 Tuklaghabad Fort steps crunching
2:52 Habitat Centre water fountains
3:02 Tuklaghabad Fort step well bass rumble
3:13 Chandni Chowk beeping and street noise
3:17 Habitat Centre Pendulum bells
3:18 Chandni Chowk lane baby and other voices
4:03 Tuklaghabad Fort aeroplane overhead
4:19 Tuklaghabad Fort cricket player’s claps
4:30 Chandni Chowk lane moped beeps
4:33 Dilli Haat Bazar toy ratchet and cartwheel noises
4:44 Dilli Haat Bazar violin melody
4:57 Chandni Chowk lane baby’s cries
5:16 Dilli Haat Bazar distant train hoot
5:26 Agrasen Ki Baoli step well cistern teenagers howling and laughing
5:54 Dilli Haat Bazar singer and violin
6:06 Chandni Chowk auto-rickshaw ride and traffic noise
7:00 Dilli Haat Bazar drumming
7:01 Agrasen Ki Baoli birds
7:06 Chandni Chowk beeping
7:12 Agrasen Ki Baoli close bird and female voice
7:36 Sultanpur Bird Sanctuary bird calls
7:49 Agrasen Ki Baoli female voices
8:14 Dilli Haat Bazar cough and rattling cart
8:39 Dilli Haat Bazar trumpet
8:50 Gurudwara Sis Ganj Sahib Sikh temple tabla and harmonium
9:12 Gurudwara singing cross-fades into Dilli Haat Bazar singer
9:24 Tuklaghabad Fort distant motorbike
9:46 Tuklaghabad Tomb’s Dome bass rumble of voices
9:58 Shri Digambar Jain Lal Mandir Jain temple traffic
10:05 Dilli Haat Bazar singer and and Jain temple traffic beeping and voices
11:02 Habitat Centre crows and traffic
11:38 Habitat Centre pendulum bells and bird
12:07 ME thanking the pendulum swinger
Leave a Reply